Hey readers! Remember those New Year's resolutions I had? Well, it turns out I've finally made those hot pants. Today, I share with you my colorful, new shorts & the interesting way I came to create them.
I started off by meddling through layers of fabric until I found the perfect, lightweight cotton print. Originally, I was going to do a plaid, but who wants that? I could've just taken a pair of men's boxers & worn them. Right? So I opted to go for an unusual print. It had to be something fun & colorful that I couldn't find at a clothing store. Take a look at my choice:


I started off by meddling through layers of fabric until I found the perfect, lightweight cotton print. Originally, I was going to do a plaid, but who wants that? I could've just taken a pair of men's boxers & worn them. Right? So I opted to go for an unusual print. It had to be something fun & colorful that I couldn't find at a clothing store. Take a look at my choice:
 |
| "Jomo Dot" The Alexander Henry Fabrics Collection |
Now, I know the next steps sound a little off kilt, but overall this is what I did.
I mentally cut my body in half - from the front and from the side.
I measured from below my belly button to the outside of my hip.
Next, I measured from in between my legs, where the shorts would fall, to the outside of
my thigh.
Then, I measured how long I wanted the shorts to be & how high I wanted them to sit at my waist.
I added 2 inches to all those measurements which included seam allowance throughout.
I drew out my front side pattern on tissue paper. (cut 2)
For my behind, I added a deeper arch, (for the bum), and added 4 inches for space & a loose fit.
I drew out my back side pattern on tissue paper. (cut 2)

Usually, I go straight for the fabric, but I really wanted flawless shorts. And the only way I was going to get them was to make a 'false' pair using scrap fabric.
And I'm so happy I did, because I got to try them on, see how they feel and tweak my measurements.
I took them apart from the center so that at my hips I had no side seams on my end product.
I traced it onto tissue paper again & that is what I used for my pattern.


I drew this out on paper to show you what my pattern looked like.

(The fold would be your side.)

I cut my fabric, serged & straight stitched the tops & bottoms of each piece prior to connecting them.

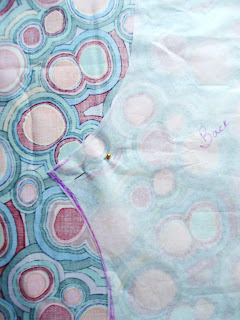
The picture below shows you how different of an arch your front & back will have.
That is why I could not create a pattern where the material was cut 'on the fold'.


I stitched the front & backsides together from the waist to in between the legs.
Then, I 'opened' my shorts.....

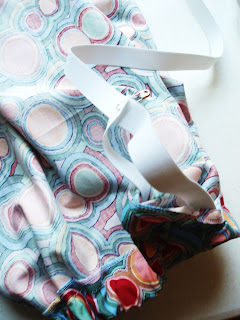
Next, I serged & stitched in between my legs like the picture below.


The top portion was folded over to create the waistband, keeping pins
in place to remind me where to stop stitching so the elastic could go in.


I made this thick fold inward to be able to fold them out having the same fabric side showing.
Lace was added too:)


The completed shorts!

So comfy!


I love these shorts! Are they really hot pants? Nahhhh... not really. I would say that they're more like house or pajama shorts. The lace adds a delicate detail making it feminine & fun. If you're planning on taking a try at creating your own pair, here's a few things to remember:
1. You will always have a deeper arch by your bum, for your bum.
2. How short do you wants your 'shorts' to be?
3. Do you want hip huggers or belly bands? ...... belly bands it is!
4. Don't forget seam allowance!
5. Make a false pair first. It's better to do a project twice to get a good
result in the end.
& last...
6. Elastic is a women's best friend:)
To sportin' shorts till next time:)
My legs shall be enjoying the sunshine!
Comments
Post a Comment