
The Infinity Ruffle Scarf


A new shipment of fabric couldn’t have arrived at a better time. In the middle of Project Runway re-runs and the girls being in school, a cardboard box was awaiting my presence. And when I opened it… Jackpot an extra couple inches because I got the end of the bolts!


Creativity’s on a roll as I immediately knew what to do with that extra soft striped fabric.
Take a look at this super easy and cute October scarf!

 
The striped, rayon fabric has a width of 65 inches. For the projects purposes, make this width your length. The first step is to decide how thick or 'chunky' you want your scarf to be.
I do this by folding it over and playing around with my 'new width'.
 
 
Next, I measured four inches and cut a strip.
Cut two more. Once all three 4" strips are cut, stitch them together at the
sides for one super long piece.

 
Set your machine on the longest stitch available so that you can gather to make ruffles.
 
 
Start from one side and work the gathers together.
Do the same to the other side.
It is near impossible to gather this all the way through without
this nifty and time saving technique:
 
For gathering in the center,
use your seam ripper to pull for more gathers.
Don't worry if the thread breaks.
Just tie the ends to stop from pulling apart.


I love using this fast way to gather really long ruffles.
By pulling the thread centrally, you are able to create a more balanced look.

 
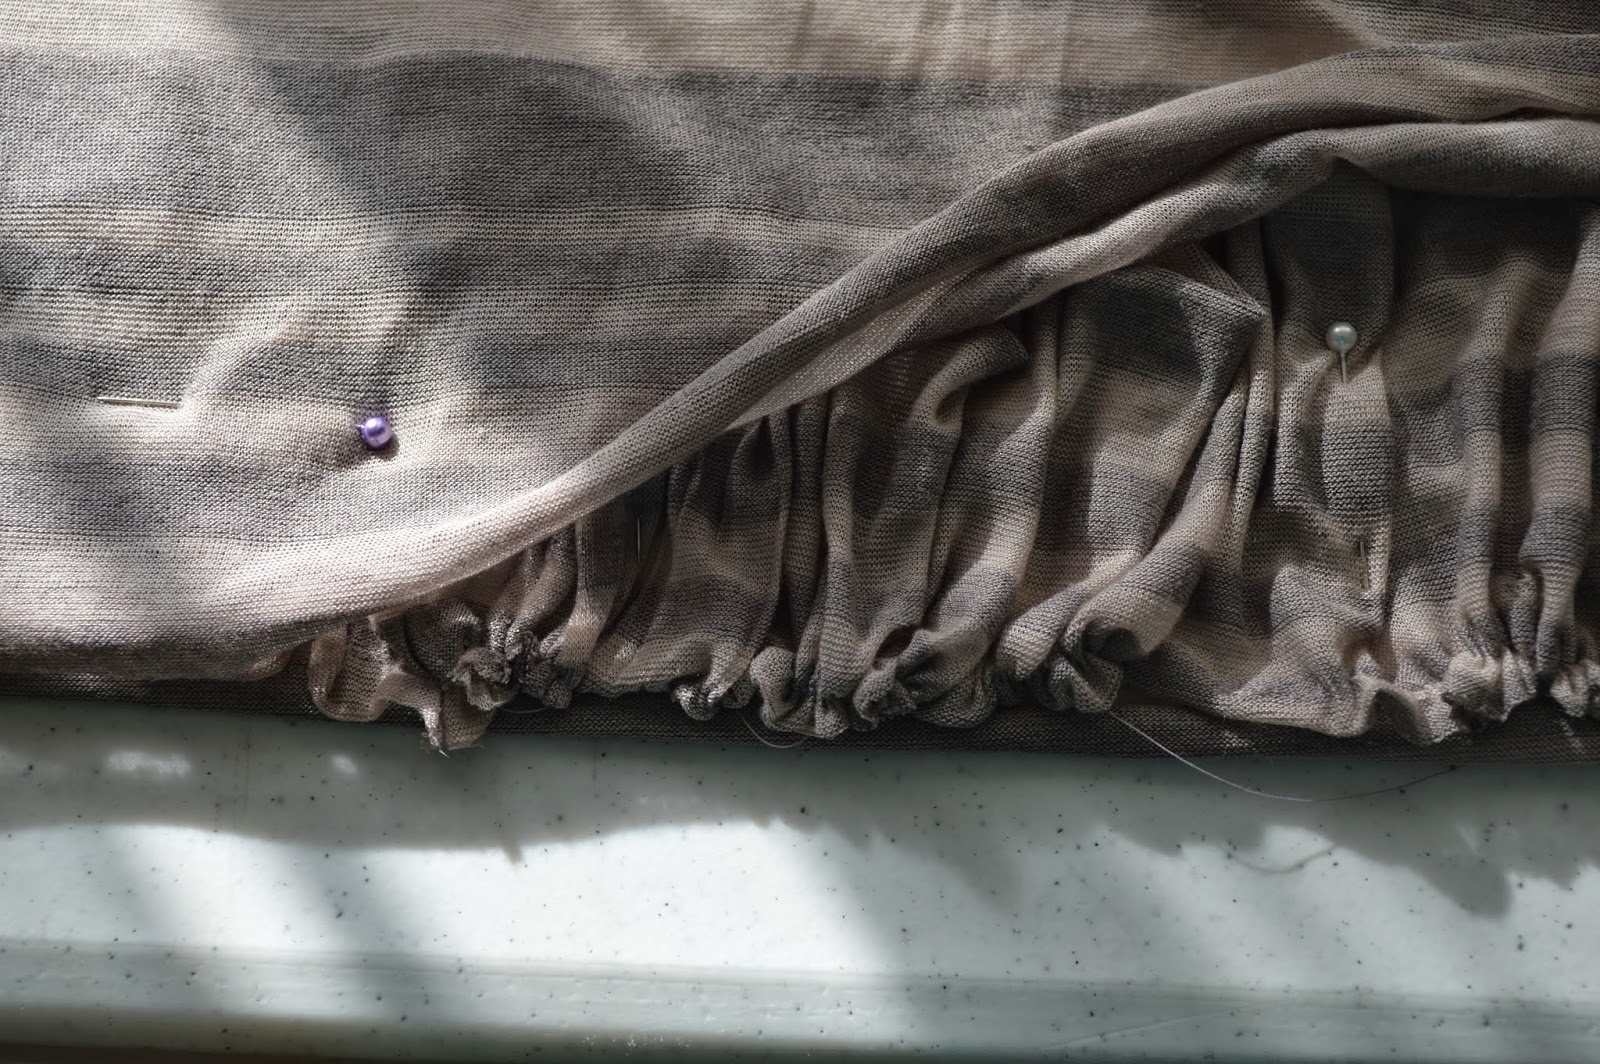
Once your gathers are together, place the ruffles on top of the scarf.
Face sides should be against eachother.
Pin the ruffles in place.
This is the most time consuming part because you will
have to elongate or shorten your ruffles.
(Another benefit of the central gathering technique using the seam ripper.)
 
 
Fold over the other half of the scarf and pin in place like the picture below.
It should kinda look like a sandwich with all face sides internal.

 
Stitch them together but don't forget to shorten your stitch length on your machine!

 
Carefully, turn it inside out and remove all the pins.
Fold it in half ~ width wise and line up the ruffles.
Both 'open' ends should be next to eachother.
Sew your scarf shut by starting in the center and circling around till you
almost meet the ruffles.
 
 
Close the scarf with some hand stitches.
 
 
So versatile! You can wear it long or folded over!
 
 
That is it my friends! Another cute one to add to the wardrobe:)


Happy Trails to infinity scarfs and beyond!
 

Comments

Popular posts from this blog

Crystal Knob Rack

So... what can you do with a piece of wood measuring 45 inches by 3 1/2? Well, if it's 1 inch thick, you can use it to make the cutest wall rack. But instead of using hooks, use drawer knobs!   Here's how the idea got started. I needed a place to photograph kids aprons. Now, most of you know that my girls have been modeling them, but they can't model toddler aprons, right? All I could picture was a gorgeous crystal knob rack used to display those mini aprons I love to make. And after searching in stores and online, I realized they are not very easy to find. Soo...... "oooohhh hubby.... can you drill a few holes in this piece of oak wood I found in the barn?"   Of course he did it in a heart beat & he even sanded it down too! The holes were positioned like this: I did the two outer ones first, then measured to the center in between those. And again, the middle of the center and outer one. Got it? I took some regular creamy white wall paint I had left

The Ogden Cami ~ A Review

Hello friends! I hope you all had a wonderful February and a great start to March! Spring is right around the corner and I'm counting down to daylight savings on March 10th! Hooray for longer sunshine! Lately, I've been longing to go back to stitching up clothes. And... I ended up finding the cutest pattern to get me back in the groove at Hawthorne Threads . The Ogden Cami by True Bias Patterns is perfect and quite simple! I started off by making a test run with some red, light-weight fabric, figuring if this comes out good, I'll have 2 tops! And guess what? It came out awesome! Making a practice piece was a great idea. It's always recommended and there are so many reasons why. In the instructional booklet, I wrote myself little notes.  ~ cut the fabric 1/4" larger at the sides so I can use a serger. This will allow me to have finished ends and still a good seam allowance.  ~ cut the straps 1/2" larger, so the

January.... you're almost done!

Hello friends!  I feel like it's been forever since my last post. I suppose some might even say I've been spending nearly all my time on the forefront of creative madness along with trying to continue healing. Holy smokes! Chemo and radiation will change a person forever. I'm continuing my healing journey, and staying hopeful that I'll remain in the 'clear' for a long time. It's odd, the way you feel, when everything you've gotten accustomed to: the running around, working day to day, rushing here and rushing there.... how quickly it changes when it's no longer a necessity. Yes, I am extremely thankful that my spouse supports and pushes for my healing time, omitting nurse life as it was, but like I told my girlfriend the other day, "how many craft projects can a girl possibly do?" ..... Well let me just tell you..... A LOT! Today's post will revisit some Instagram pics, (in case you don't follow along) with some of my most recent